Mosaic pizza oven design: visual ideas and heat-safe build guidance
Mosaic pizza oven design: visual ideas and heat-safe build guidance
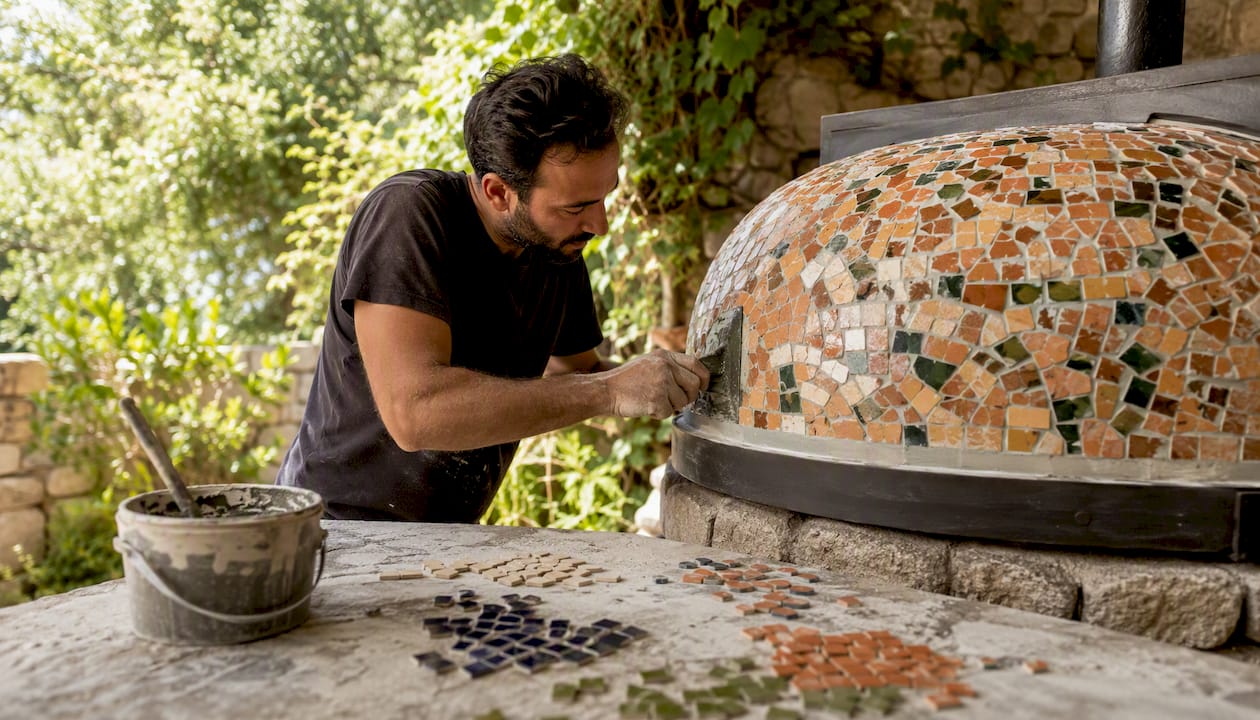
Yes, you can build a mosaic pizza oven, and done properly it is one of the most striking outdoor structures you can commission. The mosaic sits on the exterior only, over a firebrick firebox, insulation, and a proper render substrate that manages heat movement.
- Where to tile: the dome face and exterior shell, never the interior cooking chamber.
- What works: heat-rated ceramic, glass mosaic, and refractory adhesives.
- What to avoid: domestic wall tile or standard tile glue anywhere near the structure.
For a professionally installed result, working with a specialist such as Vesuviano Forni removes the guesswork around refractory adhesives, insulation ratings, and dome temperatures that regularly exceed 700 to 800 degrees in normal use.
Key Takeaways
A mosaic pizza oven design succeeds only when refractory-grade materials, heat-rated adhesives, and proper insulation layers govern the build before any tile is laid.
| Point | Details |
|---|---|
| Tile the exterior only | Mosaics belong on the dome face and outer shell, never inside the firebox itself. |
| Match adhesive to heat | Use refractory mortar or high-heat flexible adhesive, never standard tile glue. |
| Plan for movement | Build in expansion joints and a flexible substrate to absorb thermal expansion. |
| Consider panels for complex motifs | Pre-fabricated mosaic panels reduce onsite risk and simplify future repairs. |
| Work with specialists for commercial builds | Vesuviano Forni offers bespoke design, sourcing, installation, and aftercare for mosaic ovens. |
Table of Contents
- At-a-glance checklist for mosaic pizza oven design
- Oven anatomy and why layers determine how you apply mosaics
- Tile and material selection: what works, what to avoid, and why
- How to attach mosaics to a curved dome: practical installation techniques
- Common problems, how to avoid them, and maintenance tips
- Design inspiration and practical pattern examples
- Timeline, rough cost ranges, permits, and safety considerations
- Custom mosaic oven design and installation from Vesuviano Forni
- Frequently asked questions
- Sources
At-a-glance checklist for mosaic pizza oven design
Before you sketch a single tile pattern, settle the practical questions that decide whether your design survives its first winter. Start by deciding whether the mosaic covers the full dome or just the face and base, since a face-only design is considerably more forgiving of thermal movement.
- Confirm the insulation layer (ceramic blanket, vermiculite, or perlite mix) is specified and installed before render goes on.
- Choose exterior tile types rated for heat: glazed ceramic, porcelain, or specialist glass mosaic.
- Use refractory adhesive and high-temperature grout, never standard tile adhesive.
- Never tile inside the firebox itself; that surface must stay bare firebrick or castable refractory.
- Check flue clearance and keep the mosaiced shell clear of combustible surfaces.
- Wear gloves and eye protection when cutting tesserae and mixing refractory cement.
Wood-fired ovens routinely reach 700 to 800 degrees at the dome surface during firing, which is precisely why the adhesive specification matters more than the tile choice itself.
Pro Tip: Design your mosaic in sections that correspond to removable panels or repairable zones. If one area cracks after a few seasons, you replace a panel rather than re-tiling the whole dome.
Oven anatomy and why layers determine how you apply mosaics
A mosaic finish only works because of what sits beneath it. Every commercial or wood-fired oven is built in layers, and each one exists to manage heat before it ever reaches the decorative surface.
- Firebrick or refractory firebox — the cooking chamber itself, built to withstand direct flame and food contact.
- Insulation layer — ceramic blanket, vermiculite, or perlite screed that stops heat escaping and protects the outer shell.
- Structural render or substrate — a stiff but slightly flexible base that the mosaic actually bonds to.
- Mosaic finish — applied last, once render has cured and the structure has been test-fired.
This build sequence, where mosaics go on only after insulation and render are installed, is standard across properly constructed wood-fired ovens. Thermal mass in the firebrick, the insulating performance of the middle layer, and the stiffness of your render substrate all dictate which tiles and adhesives will actually hold.
Before any tiling begins, work through this sequence:
- Verify the firebox was built to a recognised refractory standard.
- Confirm insulation thickness and material match your oven’s expected firing temperature.
- Prepare a substrate with enough flex to absorb dome movement.
- Plan expansion joints into the design before you lay a single tessera.
Our own guide to custom outdoor oven construction walks through this layering in more depth if you’re planning a build from scratch.
Tile and material selection: what works, what to avoid, and why
Not every tile that looks good in a bathroom belongs on an oven exterior. Suitable materials for the outer shell are heat-resistant ceramic, porcelain rated for thermal shock, and specialist glass mosaics designed for exterior heat exposure. The interior firebox is a different matter entirely: it must use food-safe refractory brick or castable refractory material, and decorative tile has no place there, ever.
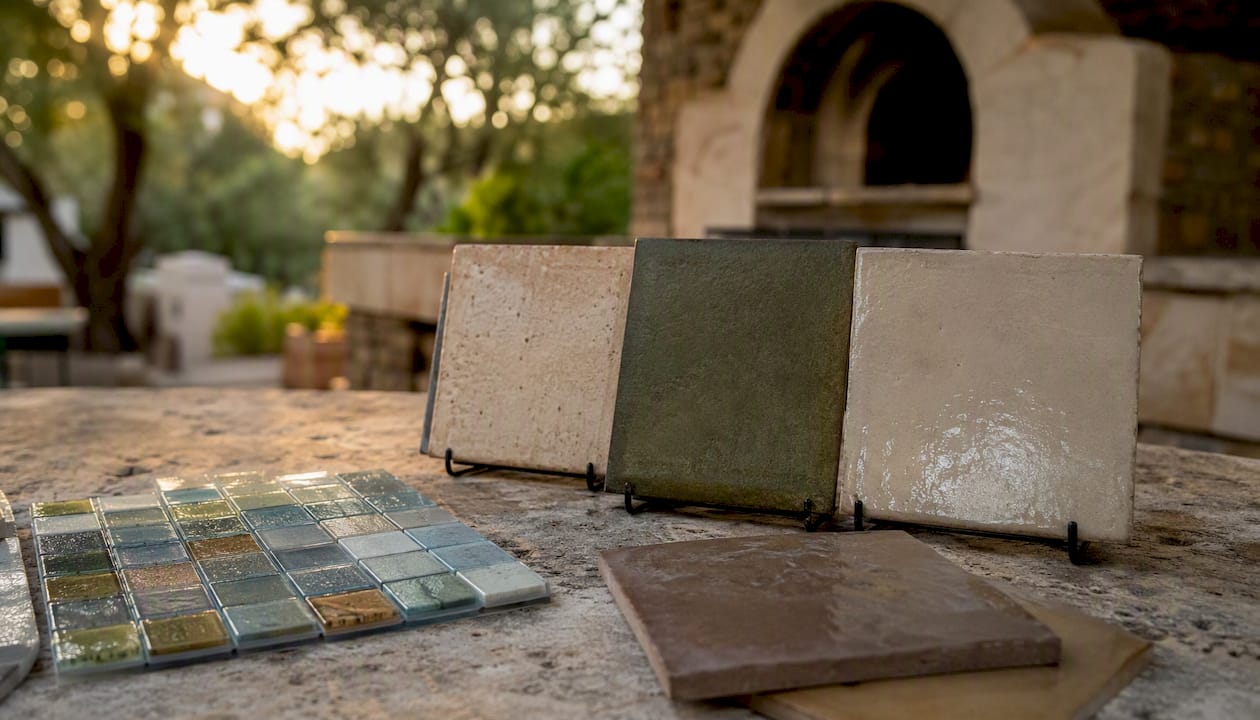
Adhesives and grout matter just as much as the tile itself. Refractory mortar, high-heat-rated flexible adhesives, and heat-tolerant grout or silicone joints all allow for the expansion and contraction a dome goes through with every firing cycle.
| Material | Thermal shock resistance | Colour range | Relative cost |
|---|---|---|---|
| Glazed ceramic | Good | Wide | Moderate |
| Porcelain mosaic | Very good | Moderate | Moderate to high |
| Specialist glass mosaic | Good (heat-rated only) | Wide | Higher |
| Standard domestic tile | Poor | Wide | Low (unsuitable) |
Avoid these mistakes regardless of budget:
- Domestic wall tile, which was never engineered for repeated heat cycling.
- Standard tile adhesive rather than a refractory or high-heat formulation.
- Any tile with high water absorption, which traps moisture and spalls under heat.
How to attach mosaics to a curved dome: practical installation techniques
Curved surfaces punish shortcuts. The sequence below is what separates a mosaic finish that lasts decades from one that cracks within a year.
- Cure and fully dry the oven structure before any decorative work begins.
- Apply insulation layers according to the oven manufacturer’s specification.
- Install a reinforced render or substrate with backing mesh suited to curved surfaces.
- Fix mosaic tiles using a refractory or high-heat-rated flexible adhesive.
- Grout with a heat-tolerant grout or silicone joint system.
- Allow full cure time before the first firing, then fire slowly to avoid early thermal shock.
You’ll need a specific toolkit for this work, distinct from standard tiling:
- Tile nippers for shaping tesserae around curves.
- Notched trowels designed for curved application.
- Flexible backing mesh to hold tiles during curing.
- Refractory adhesive and heat-tolerant grout.
- Gloves, eye protection, and a respirator when mixing refractory cement.
Pro Tip: For complex motifs, consider pre-fabricated mosaic panels fixed with stainless anchors rather than tiling the dome in situ. Panels can be built off-site under controlled conditions and swapped out individually if damaged, which makes future repairs far less disruptive.
Common problems, how to avoid them, and maintenance tips
Most mosaic failures trace back to one of four causes: thermal expansion mismatch between tile and substrate, moisture trapped behind tiles, the wrong adhesive, or simple mechanical impact from careless handling.
- Build in expansion joints at regular intervals rather than tiling one continuous rigid sheet.
- Choose adhesive rated for your oven’s actual operating temperature, not a generic exterior product.
- Keep the substrate dry before tiling and avoid sealing in residual moisture.
- Fire slowly for the first few cycles rather than pushing straight to full heat.
A dome that goes from cold to full firing temperature too quickly is the single most common cause of early cracking in a newly mosaiced oven. Slow, staged firing over the first few uses lets every layer, from firebrick to grout, adjust gradually.
For ongoing care, inspect grout lines each season, re-grout small cracks before they widen, and clean tiles gently rather than with abrasive tools. Small sections can usually be repaired individually without disturbing the surrounding mosaic.
Design inspiration and practical pattern examples
Pattern choice is not purely aesthetic on a curved dome; it interacts with the physics of the surface. Radial motifs that follow the curve of the dome distribute visual weight evenly and tend to hide minor grout lines better than rigid geometric grids. Border trims around the arch, banding at the base, or face-only mosaics all read well and avoid the cracking risk that comes with covering an entire rigid dome in one uninterrupted panel.
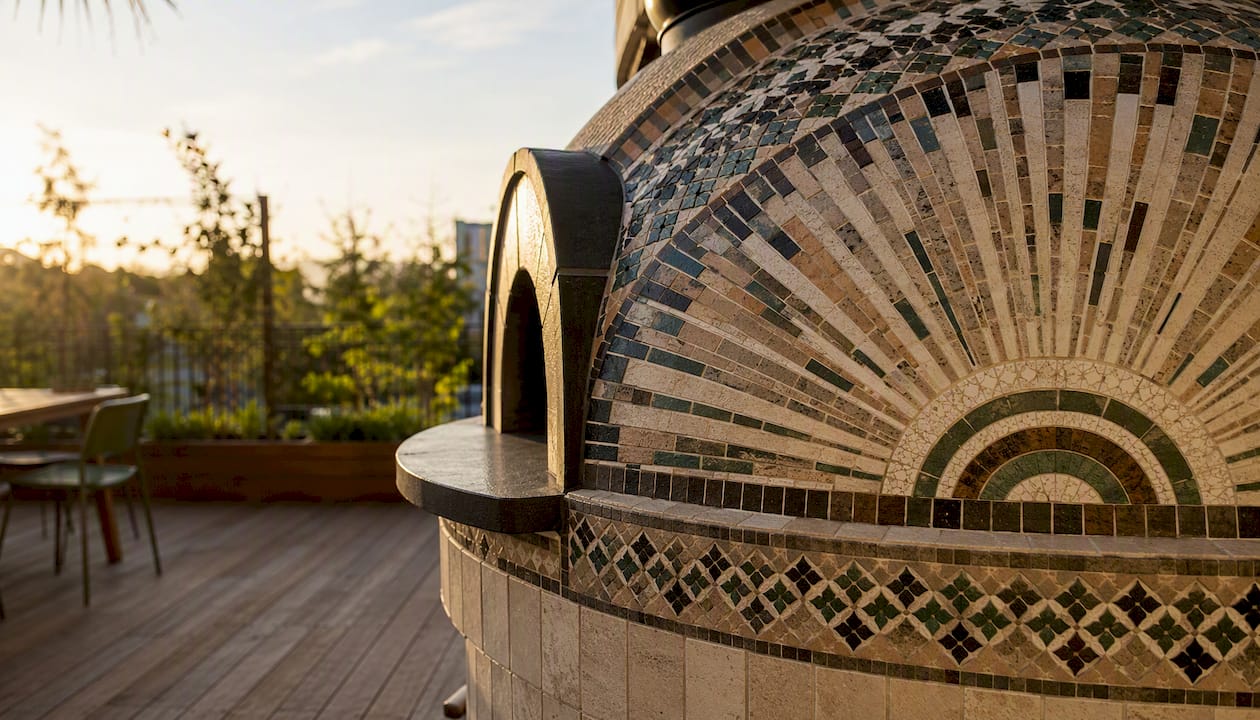
Tile scale should track curvature: smaller tesserae work better on tighter curves near the crown of the dome, while larger tiles suit flatter lower faces. Strong colour contrast helps a design read clearly from across a garden or terrace, which matters more than most people expect once the oven becomes the anchor of an outdoor kitchen layout.
Artist-built examples consistently show that mosaics work best as expressive exterior art rather than full structural coverage. When gathering visual references, look for close-up grout detail shots alongside full-oven views, and credit the original artist or builder wherever you source inspiration images.
Timeline, rough cost ranges, permits, and safety considerations
A realistic build schedule runs in stages: site preparation and base work typically take one to three days, building or placing a prefabricated dome another two to seven days, insulation and render a further one to three days, and mosaic work anywhere from a few days to several weeks depending on pattern complexity. Add cure time before the first firing regardless of scope.
Costs vary widely by scope. A face-only mosaic applied to a prefabricated oven sits at the lower end, while a fully custom hand-tiled dome with bespoke motifs commands a significant premium, particularly once professional installation and commercial-grade materials are involved.
Before committing to a design, work through this checklist:
- Check local building and fire codes for outdoor cooking structures.
- Confirm flue clearance and proximity-to-combustibles rules with your local authority.
- Use heat-resistant stands or non-combustible counters rather than standard domestic furniture beneath or around the oven.
- Consult a professional installer for any commercial-scale project.
Why we specify heat-rated materials on every mosaic project
At Vesuviano Forni, we’ve watched enough decorative finishes fail on ovens built without proper refractory specification to know that beauty and heat management are not competing priorities, they’re the same job done correctly. Our bespoke installation service pairs traditional Neapolitan craftsmanship with modern insulation systems, including the low-emission VesuvioBuono build, so a mosaic exterior stays intact through years of daily firing rather than one enthusiastic first season. If you’re planning a commissioned mosaic oven, get in touch with our technical consultancy team before you finalise a design.
Custom mosaic oven design and installation from Vesuviano Forni
Vesuviano Forni handles the part most DIY mosaic projects get wrong: matching the decorative finish to the oven’s actual thermal behaviour, so the design you commission still looks sharp after hundreds of firings, not just the first.
We offer factory-built ovens finished to your mosaic specification, or full on-site construction where our team builds and tiles the dome in place. Either route includes design consultation, material sourcing rated for genuine commercial firing temperatures, installation, test-firing, and after-sales support. Our handcrafted Neapolitan oven range covers wood-fired, gas, and electric configurations, and our team can also manage a fully built-on-site installation if you’re integrating the oven into an existing outdoor kitchen build. If you’re weighing up a commissioned mosaic oven for a restaurant, hotel, or hospitality venue, reach out to our team for a project consultation and a quote tailored to your site.
Frequently asked questions
Can you put mosaic tiles on a pizza oven? Yes, on the exterior only. The dome face and outer shell can carry heat-rated ceramic, porcelain, or glass mosaic, provided the adhesive and insulation are specified correctly.
What tiles are safe for pizza oven exteriors? Glazed ceramic, porcelain rated for thermal shock, and specialist heat-rated glass mosaics all work. Standard domestic wall tile is unsuitable because it wasn’t engineered for repeated heat cycling.
Can you tile inside a pizza oven? No. The interior firebox must remain bare firebrick or castable refractory material. Decorative tile has no place inside the cooking chamber under any circumstances.
How much does a mosaic pizza oven cost? Costs vary widely depending on scope, from a face-only mosaic on a prefabricated oven to a fully custom hand-tiled dome. Commercial-grade materials and professional installation both add to the price.
Do I need a professional to install a mosaic oven finish? For commercial or large-scale projects, yes. Getting the adhesive, insulation, and expansion joint specification wrong is the leading cause of cracking, so professional consultancy pays for itself in longevity.
Sources
For technical grounding, see the wood-fired oven design breakdown and outdoor pizza oven safety guidance. For visual inspiration, browse artist-made mosaic oven examples and 2026 outdoor kitchen layouts. For product specifications, visit our commercial oven range.
- Backyard pizza oven ideas for 2026
- Here’s Your Delicious Pizza: Wood Fired Pizza Oven Design
- Mosaic pizza oven (artist example)