Pizza oven cracks: causes, repair and prevention
Pizza oven cracks: causes, repair and prevention

Hairline cracks of around 1 mm are a normal part of any masonry or refractory pizza oven’s life.
, and any crack that runs through the full thickness of the dome requires professional assessment before you fire the oven again. If you have just spotted a crack, take these steps now: measure the width with a ruler or feeler gauge, photograph it from multiple angles. Stop high-temperature firing if the crack exceeds 2 mm, and cover the oven with a breathable cover to keep moisture out until you have assessed the damage properly.
- Measure the crack width before anything else.
- Stop high-heat use if the crack is visibly wide or shows signs of going through the dome.
- Photograph the crack for reference and to track whether it grows.
- Cover the oven to prevent moisture ingress, especially overnight or before rain.
- Follow the repair steps below if the crack is surface-level or in the render/mortar.
Table of Contents
- What kind of crack do you have, and how serious is it?
- Why do pizza ovens crack? The main causes
- Can you keep using an oven that has cracks?
- How to repair surface and mortar cracks yourself
- When should you call a professional?
- Vesuviano Forni’s perspective on professional ovens and long-term care
- Practical prevention: how to protect your oven through a UK winter
- Tools, materials and where to buy them in the UK
- Key takeaways
- The mistake most oven owners make
- Vesuviano Forni: professional ovens built to last
- Further reading and sources
What kind of crack do you have, and how serious is it?
Not all cracks are equal. Knowing which type you are dealing with determines whether you can carry on cooking, repair it yourself, or need a professional.
| Crack type | Typical width | Likely cause | Urgency |
|---|---|---|---|
| Hairline / crazing | Narrow, hairline size | Normal thermal expansion during curing | None — cosmetic |
| Plaster / render crack | Slightly wider surface cracks | Surface shrinkage, minor thermal movement | Low — monitor and repair when convenient |
| Mortar joint crack | Noticeably wider cracks | Over-firing during curing, frost heave | Medium — repair before next season |
| Full-thickness / thermal crack | Any width, through the dome | Foundation movement, severe thermal shock | High — stop use, seek professional assessment |
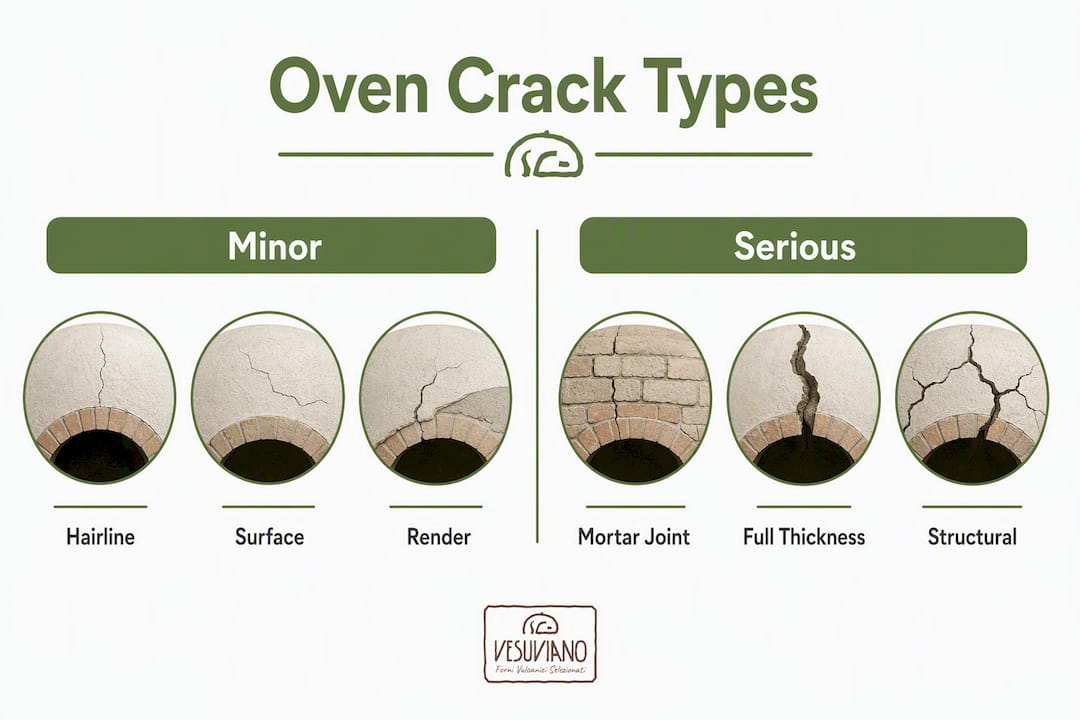
Hairline crazing appears as a fine network of surface lines across the dome or render. It is cosmetic and does not affect cooking performance or structural integrity.
Plaster and render cracks sit in the outer layers only. Run a fingernail across the crack: if it catches but does not flex, the underlying refractory material is likely intact.
Mortar joint cracks open between bricks or stones. These are more significant because the joint is a structural element. Spalling or chunks of material breaking away suggests moisture has penetrated and frozen inside the masonry — a more urgent situation.
Full-thickness cracks are the ones to take seriously. Shine a torch through the crack from outside while someone checks the interior in low light. If daylight or torchlight passes through, the dome wall has been breached. Also look for smoke or steam escaping from the fissure during firing — that is a clear sign of through-thickness penetration.
Why do pizza ovens crack? The main causes
Cracking is almost always the result of thermal stress, moisture, or a combination of both. Understanding the cause helps you choose the right repair and avoid repeating the problem.
- Curing errors. Rushing the initial fires is the single most common cause of larger cracks. Correct curing means several low fires over a few days, not one high-temperature session on day one. The moisture locked into fresh mortar and refractory material needs to escape gradually.
- Thermal shock. Rapid temperature swings — pouring cold water on a hot dome, or firing straight to maximum heat from cold — stress the material beyond its tolerance.
- Poor mix or inappropriate mortar. Standard builders’ mortar lacks the heat-rated binder chemistry needed for a wood-fired environment. Patches made with the wrong product often fail on the very next fire.
- Frost heave and moisture ingress. Water trapped inside masonry expands when it freezes, widening existing fissures. In the UK, freeze–thaw cycles make moisture ingress the most important prevention target for outdoor ovens.
- Foundation movement. A poorly prepared base that shifts seasonally transmits stress directly into the dome. This is the root cause of most full-thickness cracks.
Pro Tip: Before your first fire of the season, check the ground around the oven base for any signs of heaving or settlement. A few millimetres of movement at foundation level can translate into a significant crack higher up the dome.
Can you keep using an oven that has cracks?
For hairline cracks under 1 mm, yes. You can continue cooking with gradual, moderate fires while you plan a repair at your convenience. For anything wider or deeper, the answer depends on what the crack is telling you.
Do:
- Continue lighting small, low fires if the crack is hairline and purely cosmetic.
- Monitor the crack’s width over several sessions to check it is not growing.
- Carry out a proper curing schedule if the oven is new or has been unused over winter.
- Keep the oven covered between uses to prevent water entering the crack.
Do not:
- Fire the oven to full temperature if any crack is larger than a hairline crack in width.
- Pour water onto the dome to cool it quickly — thermal shock will widen existing cracks.
- Ignore spalling or falling material; that is a sign of moisture damage, not normal thermal movement.
- Use the oven at all if the crack appears to pass through the full dome thickness until you have had it assessed.
A quick pre-bake checklist: measure the crack, check for new spalling, confirm the crack has not grown since your last inspection, and make sure the oven is dry before lighting.
How to repair surface and mortar cracks yourself
This method covers hairline, render, and mortar joint cracks. Full-thickness cracks need professional attention — do not attempt to patch them from the surface alone.
What you will need
- Refractory cement or a manufacturer-approved repair kit
- Thermal cob or plaster mix (for earthen/cob ovens)
- Clay slip or slurry (for reactivating earthen repairs)
- Perlite or vermiculite (for insulation layer replacement)
- Putty knife, trowel, and stainless-steel spatula
- Soft-bristled brush and misting bottle
- Feeler gauge or ruler
- Safety glasses and gloves
- Plastic sheeting for slow-drying patches
Step-by-step repair
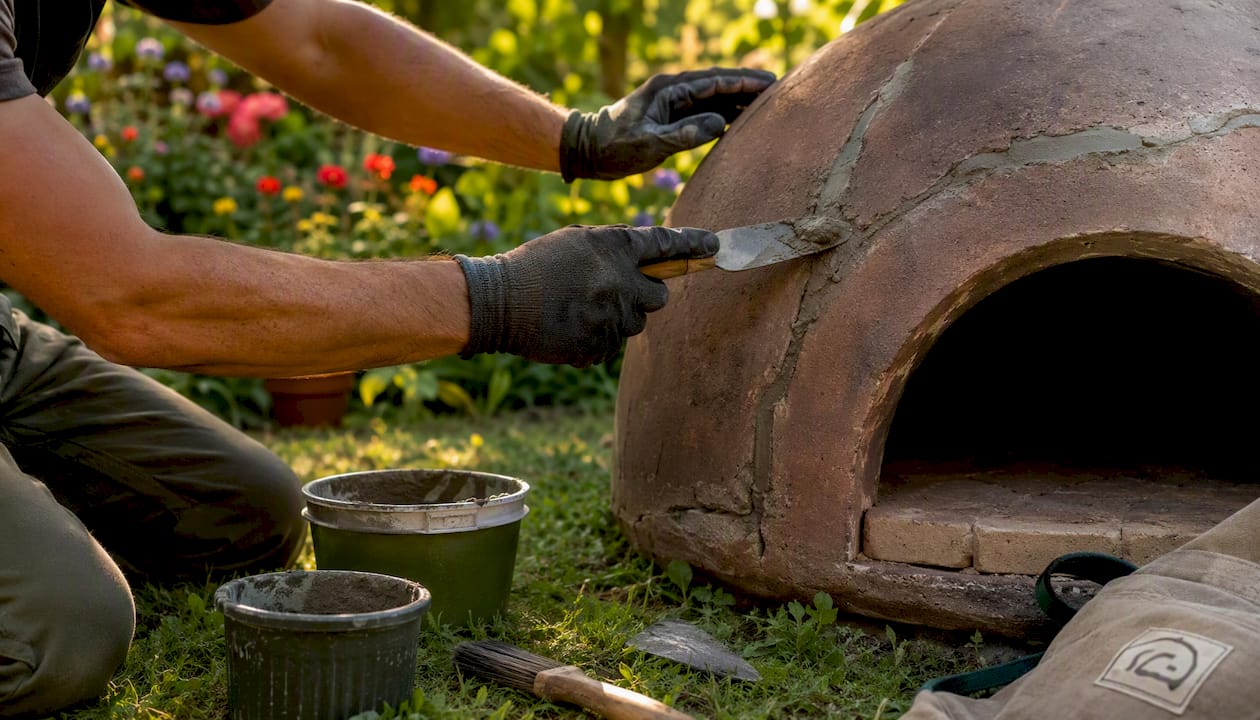
- Prepare the area. Allow the oven to cool completely. Brush away loose material with a soft-bristled brush and remove any crumbling render or mortar with a putty knife. Do not use water on a warm surface.
- Open the crack if needed. For mortar or render cracks wider than 2 mm, use a narrow tool to open the crack into a shallow V-shape. This gives the repair mix something to grip.
- Pre-wet the surface. Mist the crack and surrounding area lightly with water. This prevents the dry masonry from wicking moisture out of the repair mix before it sets, which causes shrinkage and re-cracking.
- Pack the repair mix. For refractory cement repairs, follow the manufacturer’s mixing ratios and press the mix firmly into the crack, working from the deepest point outward. For earthen or cob ovens, reactivate the clay surface with moisture, then pack with thermal cob or slip and smooth flush with the surrounding surface.
- Restore insulation and finish layers. If the crack reached the insulation layer, pack perlite or vermiculite back in before applying the final render. Skipping this step leads to heat loss and repeat cracking at the same spot.
- Cure the patch. Cover the repaired area loosely with plastic sheeting and keep it shaded. Allow refractory cement repairs to dry for at least 4 hours before any heat. Earthen or cob repairs benefit from slow drying over one to two weeks to avoid shrinkage.
- Slow reheat. Once dry, reintroduce heat gradually. Light a small fire for 30–45 minutes, allow the oven to cool, then repeat over several sessions, increasing temperature incrementally. Do not go straight to full cooking temperature.
Pro Tip: Only use heat-rated refractory products for any repair inside or on the dome. Standard hardware-store mortar will fail on the first firing — the binder chemistry simply cannot withstand the temperatures a wood-fired oven reaches.
When should you call a professional?
Some situations are beyond safe DIY repair. Stop heavy use and contact a qualified mason or the oven manufacturer if you notice any of the following.
- Cracks that pass through the full thickness of the dome wall (confirmed by the torch test).
- Visible offset or displacement between sections of the dome — one side sitting higher than the other.
- Spalling or large chunks of material falling away from the interior.
- Evidence of foundation movement: uneven settling, cracked base slab, or ground heaving around the oven.
- The same crack reopening season after season despite repeated patching.
- Smoke or steam escaping from a fissure during firing.
When you see these signs, photograph everything, stop high-temperature use, and cover the oven. A professional assessment will examine the foundation for frost heave, test the integrity of the mortar mix, confirm whether the crack penetrates the full wall thickness, and advise whether partial rebuilding or structural remediation is needed. Surface patching alone will not solve a foundation problem — and attempting it can mask the underlying issue until the damage becomes far more extensive.
Vesuviano Forni’s perspective on professional ovens and long-term care
Correct curing, heat-rated repair materials, and consistent seasonal maintenance are the three pillars that protect both the performance and the longevity of a professional pizza oven. At Vesuviano Forni, our artisans have built handcrafted Neapolitan ovens for generations, and the guidance we give every client reflects that depth of experience.
Rushing the initial curing process is the most common reason a new oven develops cracks beyond normal hairline movement. A proper curing schedule — several low fires over consecutive days — allows moisture to leave the refractory mass gradually. Skipping that process, or firing too hard too soon, places thermal stress on material that has not yet reached its stable working state. The same principle applies after any repair: the patch needs time to cure before it faces full operating temperatures.
For owners of Vesuviano Forni commercial units, our after-sales support covers technical consultancy, on-site assessment, and guidance on repair materials that are compatible with your specific oven construction. If you are unsure whether a crack on your commercial oven requires professional attention:
- Contact our technical team for a remote assessment using photographs.
- Request an on-site inspection if the crack shows any of the red-flag signs listed above.
- Use only manufacturer-approved repair products to protect your warranty and the integrity of the refractory structure.
Practical prevention: how to protect your oven through a UK winter
The UK’s wet winters and regular freeze–thaw cycles make moisture management the most important maintenance task for any outdoor pizza oven. A crack that is purely cosmetic in September can become a structural problem by March if water gets in and freezes.
- Cure a new oven correctly. Follow a gradual curing schedule before the first full-temperature use. Several low fires over consecutive days is the standard approach.
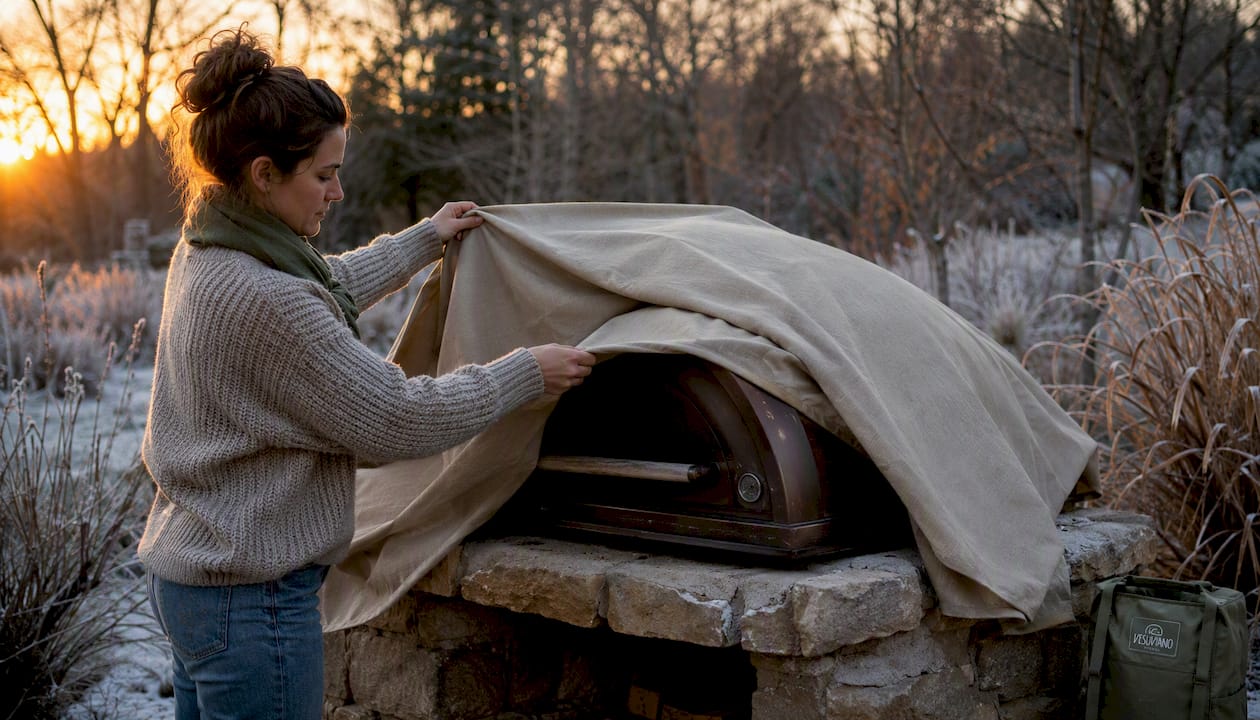
- Use a breathable cover. Fit a breathable, weatherproof cover after every use once the oven has cooled. An impermeable sheet traps condensation against the dome — which causes as much harm as thermal stress in many UK situations. Remove the cover before lighting.
- Clear ash regularly. Ash absorbs moisture. Remove it after each session to prevent damp building up inside the chamber.
- Check the chimney and flue. Blockages cause uneven heat distribution, which increases thermal stress on the dome.
- Perform a seasonal inspection. Inspect the oven at the start and end of your cooking season. Look for new cracks, spalling, or any change in the foundation. Seasonal checks at these two transition points catch small problems before they worsen.
- Light brief drying fires in winter. On dry days during the off-season, a short low fire expels trapped moisture and keeps the refractory material in good condition.
- Check drainage around the base. Water pooling around the foundation accelerates frost heave. Clear any debris that blocks drainage before winter sets in.
Pro Tip: Never cover a warm oven with an impermeable sheet. Wait until the dome is fully cool and dry, then fit the breathable cover. This single habit prevents the majority of moisture-related damage seen in UK outdoor ovens.
For more on protecting an outdoor oven through the British climate, the contemporary pizza oven guide covers seasonal care in detail.
Tools, materials and where to buy them in the UK
Essential tools
- Feeler gauge or steel ruler (for measuring crack width accurately)
- Putty knife and narrow trowel
- Stainless-steel spatula
- Soft-bristled brush and misting bottle
- Safety glasses and heat-resistant gloves
- Plastic sheeting (for slow-drying patches)
Materials comparison
| Material | When to use | UK buying tips |
|---|---|---|
| Refractory cement | Mortar joint and render cracks over 2 mm; dome repairs | Look for a heat rating suitable for wood-fired ovens; available from specialist refractory suppliers and builders’ merchants with a refractory range |
| Thermal cob / plaster mix | Earthen or cob oven repairs; surface render restoration | Source from specialist natural building suppliers; check the clay-to-sand ratio matches your existing mix |
| Clay slip / slurry | Reactivating earthen surfaces before patching | Mix from the same clay used in the original build where possible; available from pottery and ceramics suppliers |
| Perlite / vermiculite | Restoring insulation layer after deeper repairs | Widely available from garden centres and horticultural suppliers; confirm it is unfaced/untreated |
| Breathable weatherproof cover | Seasonal protection against moisture and frost | Specialist pizza oven covers from outdoor cooking retailers; confirm the material is breathable, not PVC-lined |
Avoid any product not rated for high-temperature use in the dome or mortar joints. Standard builders’ mortar, tile adhesive, and general-purpose render are not suitable — they will fail under the thermal cycling a wood-fired oven produces. Specialist refractory suppliers in the UK stock the correct products and can advise on heat ratings and mixing ratios.
Key takeaways
Hairline cracks under 1 mm are a normal feature of any masonry pizza oven; cracks over 2 mm need repair, and through-thickness cracks need professional assessment before the oven is used again.
| Point | Details |
|---|---|
| Hairline cracks are normal | Cracks of around 1 mm are cosmetic and expected after correct curing. |
| The 2 mm threshold matters | Mortar or render cracks wider than 2 mm should be repaired with heat-rated refractory products. |
| Stop high heat for large cracks | Do not fire to full temperature if a crack exceeds 2 mm or shows through-thickness signs. |
| UK moisture is the main risk | Freeze–thaw cycles turn cosmetic cracks into structural problems; use a breathable cover and check drainage before winter. |
| Vesuviano Forni offers expert support | For commercial ovens, Vesuviano Forni’s technical team can assess cracks remotely or on-site and advise on manufacturer-approved repairs. |
The mistake most oven owners make
The most common error is not the crack itself — it is the response to it. Owners who spot a crack in October often reach for whatever mortar is in the shed, fill it quickly, and fire the oven to full heat the next day. The patch fails. The crack reopens, usually wider. By the time they seek advice, the damage is more extensive than it needed to be.
The second most common mistake is covering a warm oven with an impermeable tarpaulin at the end of the season. The condensation that builds up inside does more damage over a wet British winter than the original crack would have done if left alone and kept dry.
My practical advice for anyone in a damp climate: after patching, light nothing more than a small kindling fire for the first two or three sessions. Let the patch breathe. And when the season ends, wait until the oven is genuinely cold before fitting any cover — then make sure that cover is breathable. Those two habits alone prevent the majority of the repair failures I see.
Vesuviano Forni: professional ovens built to last
When a crack signals that a repair or replacement is beyond DIY, Vesuviano Forni’s handcrafted Neapolitan ovens offer a professional-grade solution built from the right materials from the start. Every oven leaves Naples with the correct refractory construction, proper insulation layering, and a curing protocol designed to prevent the over-firing errors that cause most serious cracking.

For hospitality businesses that have outgrown a patched domestic oven, or for operators planning a new installation where foundation and siting are done correctly from day one, the commercial wood-fired pizza oven range covers everything from traditional handcrafted models to low-emission wood-fired options. Our technical team handles consultancy, installation, and after-sales support across the UK. Get in touch with Vesuviano Forni to discuss your requirements and receive a tailored assessment.
Further reading and sources
- How to Repair Exterior Cracks on a Wood Fired Oven — Fuego: Practical step-by-step repair guidance including drying times and product handling for refractory cement repairs.
- Are cracks in a wood fired pizza oven normal? — Jalando Pizza Ovens: Clear explanation of why hairline cracks appear during curing and how to distinguish them from more serious damage.
- Repair pizza oven cracks — OvenDIY: Detailed cob and earthen oven repair method, including V-shaping, misting, and slow-drying timelines.
- Outdoor pizza oven maintenance — The Examiner News: Seasonal maintenance schedule and guidance on moisture prevention for outdoor ovens.
- Wood-fired pizza oven maintenance — Nuovo Luxury: UK-focused maintenance advice covering spalling, moisture damage, and seasonal care.
- How to Repair an Outdoor Pizza Oven — This Old House: Authoritative masonry repair guidance covering cracked mortar joints, water damage, and inspection best practice.
- Vesuviano Forni: Neapolitan pizza ovens: Manufacturer guidance on construction standards, curing protocols, and after-sales support for professional ovens.