Build the Right Oven: 3 Pizza Oven Floor Thickness Recipes
Build the Right Oven: 3 Pizza Oven Floor Thickness Recipes
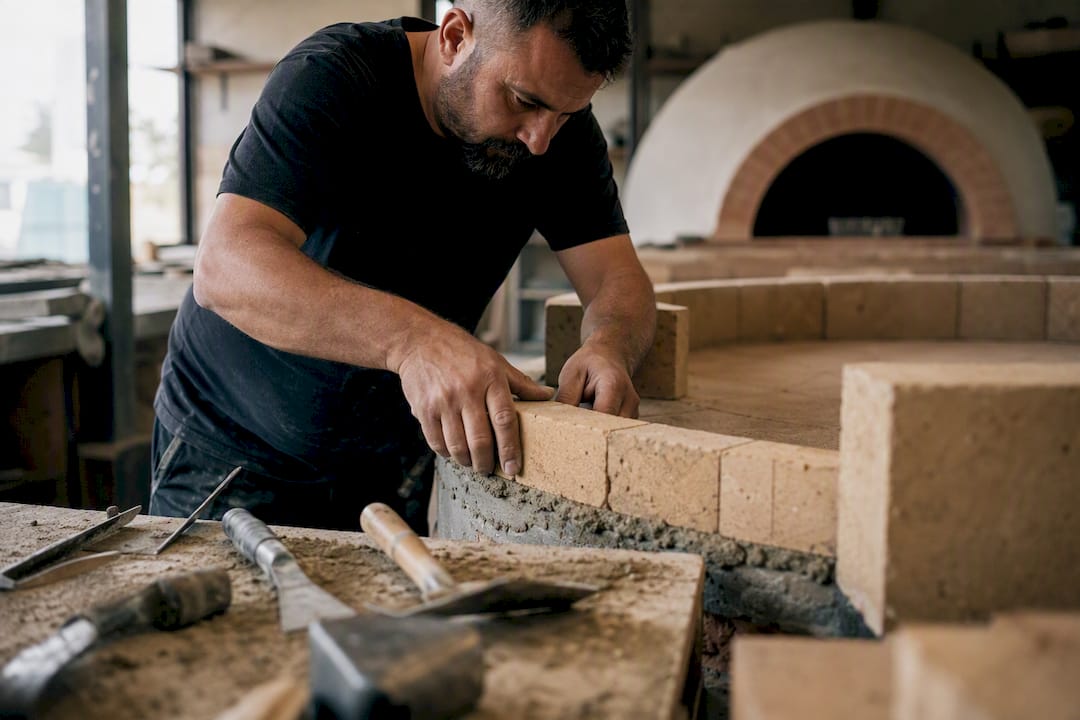
For a pizza-focused wood-fired oven, build a dense firebrick cooking floor of typical moderate thickness, laid over a layer of refractory insulation board commonly used in the range of a few inches. Increase the deck to 3 to 4 inches, or add a heat-bank layer beneath it, only if you plan to roast, bake, or run back-to-back sessions that demand longer residual heat. Insulation quality, not raw floor mass, is usually what separates a fast, reliable oven from a slow, uneven one.
TL;DR:
- Thinner decks heat up faster and are better suited for high-turnover pizza kitchens, while thicker decks maintain heat longer for extended sessions or mixed baking.
- Material choice impacts performance and durability, with firebrick offering high thermal mass and cordierite providing better resistance to thermal shock but less heat retention.
- Proper insulation beneath the deck, such as refractory boards and thermal mass layers, is more critical to heat retention than simply increasing floor thickness.
- Mismatched dome and floor insulation or mass can cause uneven heating, so balancing these elements is essential for consistent cooking results.
- Prioritizing insulation quality and system proportioning outweighs focusing solely on firebrick thickness for building an efficient, reliable oven.
Table of Contents
- Why floor thickness matters for heat retention and cooking
- Best materials for a pizza oven floor: firebrick, cordierite and beyond
- Insulation and subfloor layers beneath the cooking deck
- Getting floor and dome thickness to work together
- Floor thickness recipes for pizza-only, mixed-use and commercial ovens
- Foundation, height and installation essentials
- Craftsmanship insight: what generations of Neapolitan builders get right
- The thickness question isn’t really about the floor at all
- Why a handcrafted commercial oven beats a DIY floor guess
- Sources
Why floor thickness matters for heat retention and cooking
A pizza oven floor is a thermal battery. The thicker the firebrick, the more heat it can absorb during firing and release back into the base of each pizza as it bakes. That extra capacity comes at a cost: a thicker deck takes proportionally longer to charge to working temperature, because heat has to soak through more material before it stabilises.
This is where a lot of first-time builders misjudge the trade-off; understanding how the deck and dome share heating responsibilities in ovens like those explained on the Single Deck Pizza Oven – Superior Kitchen Equipment page can provide valuable insight. They assume a thicker floor is always better, without accounting for how long they are prepared to wait before the first pizza goes in. A moderately thick deck typically reaches Neapolitan bake temperatures faster than a much thicker deck of the same material, because there’s simply less mass to heat through.
Pilot-scale modelling of wood-fired oven thermal behaviour found that dome radiation and convection do most of the work of cooking a pizza, while floor conduction contributes a smaller yet still meaningful share of the total heat transfer. This finding matters for anyone tempted to over-engineer the floor at the expense of dome insulation: a well-insulated dome and controlled airflow can often do more for consistent cooking than simply piling on floor mass.
Firing technique interacts directly with floor thickness. A thinner deck recovers its surface temperature between pizzas more quickly, but it also cools faster if the fire dies down. A thicker deck holds its temperature through a longer session but punishes impatience during heat-up.
- Thinner decks suit high turnover, pizza-only sessions with active fire management
- Thicker decks or heat-banked builds suit longer sessions, mixed baking, or operators who can’t tend the fire constantly
- Neither is objectively “better” for heat retention; it depends entirely on the pattern of use
Pro Tip: If you’re unsure which way to go, build for your busiest realistic night, not your average one. A floor sized for a quiet Tuesday will struggle on a packed Saturday.
Best materials for a pizza oven floor: firebrick, cordierite and beyond
Material choice shapes both cooking performance and long-term durability, and it’s worth getting this right before you commit to a thickness.
Dense firebrick is the standard choice for traditional wood-fired ovens, and for good reason. It offers high thermal mass, holds up to direct flame contact, and provides a genuinely food-safe cooking surface once cured. The trade-offs are practical rather than thermal: firebrick is heavy, awkward to cut cleanly, and needs careful handling during construction. The common build practice is stacking 1.25 inch splits, so two layers give you the familiar 2.5 inch deck, and three give you closer to 3.75 inches for a heavier build.
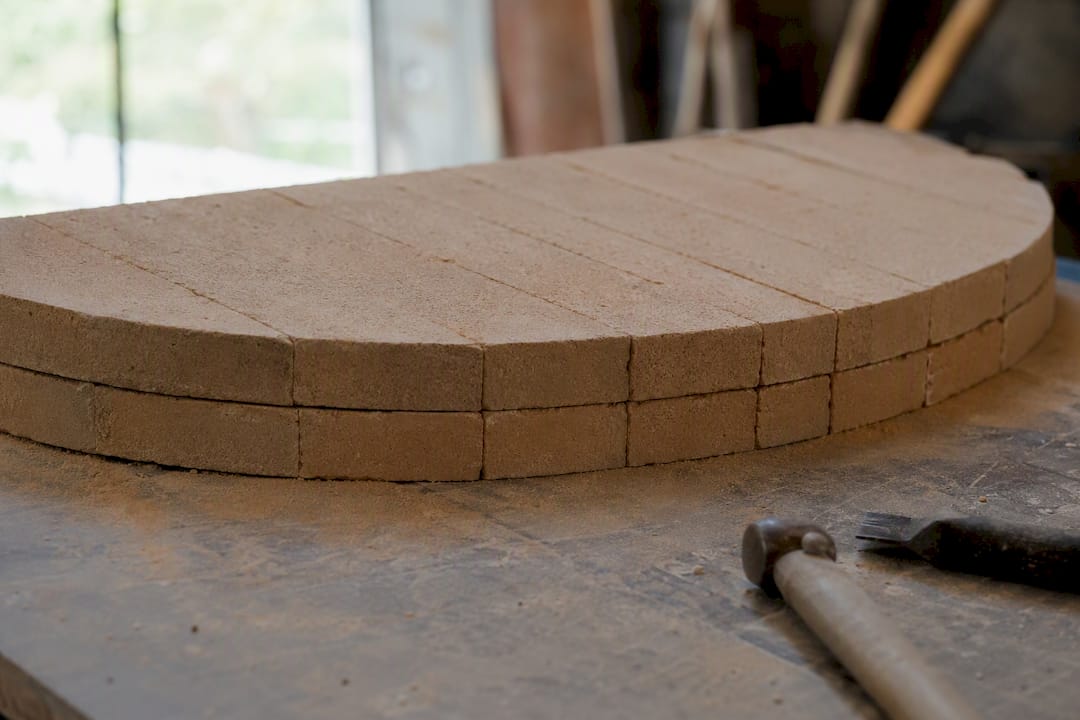
Cordierite panels are the main alternative. They offer excellent thermal shock resistance, which is why you see them in portable and panelised ovens that get fired and cooled repeatedly. Cordierite heats up faster than a solid firebrick deck of equivalent thickness, but it carries less mass, so it recovers heat between bakes less generously during long, multi-pizza sessions.
Cast refractory decks and soapstone slabs turn up in some builds, usually where a builder wants a single monolithic surface rather than jointed bricks. They can work well, but repair is the sticking point: if a cast deck cracks, you’re often looking at replacing the whole slab rather than swapping one brick. According to the pizza oven materials guide from PizzaOvenWorld, this repairability gap is one of the main reasons experienced builders still favour brick or panel systems for anything getting heavy use.
A few installation notes worth following regardless of material: keep joints as tight as possible to avoid heat escaping through gaps, never substitute ordinary ceramic tile or granite (neither tolerates the thermal cycling), and only use refractory mortar where the manufacturer specifies it, since some brick-on-sand or dry-stack methods perform better without it.
Insulation and subfloor layers beneath the cooking deck
The floor thickness question can’t be separated from what sits underneath it. A thin deck over poor insulation will lose heat downward almost as fast as you put it in, while a well-insulated subfloor lets you get away with a lighter deck and still hold temperature.
- Refractory insulation board goes directly beneath the firebrick deck. Builders commonly use 2 to 4 inches of this material, and the SSFBS guide to oven building materials identifies it as one of the single biggest upgrades available for reducing downward heat loss and cutting heat-up time.
- Ceramic fibre blanket wraps the dome rather than the floor, but it works in tandem with the floor insulation to keep the whole cooking chamber’s heat where it belongs, rather than radiating outward through the brickwork.
- Perlite or vermiculite mixes typically form the outer insulating shell, poured or packed around the dome and sometimes under the hearth slab, adding a lightweight thermal barrier that doesn’t add structural load.
- A heat-bank layer, usually sand or a poured refractory mass beneath the working deck, is an alternative to simply thickening the firebrick itself. It stores additional heat but demands more wood and a longer initial firing to charge fully.
The heat-bank route deserves a specific mention because it’s often misunderstood. Rather than a 4 inch solid firebrick floor, some builders prefer a 2.5 inch deck sitting on a dense thermal mass layer, insulated from the ground beneath. This gives you fast surface heat-up for the first pizzas, with reserve capacity building underneath for later in the session.
Getting floor and dome thickness to work together
An oven is a system, and treating the floor thickness as an isolated decision is one of the most common mistakes in amateur builds. Mismatched mass between floor and dome creates predictable problems: a heavy floor under a thin, poorly insulated dome heats unevenly, because the dome loses heat faster than the floor can recharge it. A light floor under an over-insulated dome can leave you with plenty of ambient heat but a cool cooking surface that won’t properly char a base.
Academic modelling of oven thermal behaviour suggests that a well-insulated dome with controlled exhaust reduces the need for excessive floor mass altogether. Better heat management across the whole structure often beats simply adding thickness in one place.
A few pairings tend to work reliably in practice:
- A lighter 2.5 inch deck paired with a heavily insulated dome suits fast-turnaround pizza ovens where quick heat-up matters more than long residual heat
- A heavier deck, or a deck plus heat-bank, paired with a proportionally insulated dome suits ovens doing extended sessions or mixed pizza-and-roasting work
- Chimney placement and entry (mouth) geometry also affect retention: a narrower entry and a well-positioned flue reduce the rate at which heat escapes, which indirectly reduces the floor thickness needed to hold a steady bake
Getting this balance right is as much about proportion as raw specification, which is why sizing the dome and hearth together, rather than sequentially, tends to produce a more even-cooking oven. A guide to wood-fired pizza oven dimensions is worth reviewing alongside your floor plans, since dome diameter and floor area are rarely independent decisions.
Floor thickness recipes for pizza-only, mixed-use and commercial ovens
Rather than treating thickness as a single number, it helps to think in terms of complete build recipes matched to how the oven will actually be used.
- Recipe A: pizza-only. A firebrick deck made from two stacked splits, sitting on a refractory board layer, with ceramic fibre blanket wrapping the dome and an insulated outer shell. This heats up fastest and suits high-turnover pizza service where the fire runs continuously through the session. Expect quicker recovery between pizzas but less tolerance for a neglected fire.
- Recipe B: mixed-use. A 3 to 3.5 inch deck, or a 2.5 inch deck over a dedicated heat-bank layer, combined with 3 to 4 inches of refractory board and a heavier, more insulated dome. This suits operators baking bread or roasting alongside pizza, where the oven needs to hold usable heat for hours rather than just through a dinner service.
- Recipe C: commercial or high-volume. A thicker heat-bank, or a thicker deck outright, with generous insulation and proper structural slab support beneath. This is the build for a pizzeria running continuous service across a long shift. It draws more wood and takes noticeably longer to reach working temperature, but it holds that temperature through sustained, heavy use. Anyone specifying an oven at this scale should look closely at commercial pizza oven temperature requirements before finalising the build.
Pro Tip: Don’t default to Recipe C just because you’re running a business. A busy neighbourhood pizzeria with steady, continuous service is often better served by Recipe A or B; the heavy commercial build only pays off when the oven needs to sit and hold heat for extended, low-attention stretches.
Foundation, height and installation essentials
The floor assembly is only as good as what supports it. A masonry slab over concrete block, a poured concrete slab, or a steel stand with an insulated pan are the three common foundations, and each needs a genuine thermal break between the hot hearth and the structure beneath it. Skip that break and the slab itself becomes an unwanted heat sink, quietly pulling warmth out of your floor no matter how well you’ve insulated the top side.
Community discussion around oven builds consistently points to poor edge insulation and missing thermal breaks as recurring causes of underperforming ovens that otherwise look similar to well-built ones on paper, according to builder threads on Forno Bravo’s forum.
- Set the working height so the cooking floor sits at a comfortable height for peel handling without excessive bending
- Allow the slab to cure fully before any firing begins; rushing this stage is a common cause of early cracking
- Protect the base from ground moisture with a proper damp barrier before laying insulation
- Bring in a structural engineer for any heavy commercial build, particularly where the slab spans an upper floor or unsupported base
If cracks or floor damage do appear over time, most are repairable without a full rebuild. A step-by-step troubleshooting guide covers the common fixes.
Craftsmanship insight: what generations of Neapolitan builders get right
Floor thickness decisions have been refined by generations of Neapolitan oven builders long before thermal modelling gave us the language to explain why certain proportions work. Vesuviano Forni brings together artisans from the Vesuvian area whose families have built professional ovens for decades, and that lineage shows up in details a spec sheet alone can’t capture, such as how deck material is graded and positioned across the cooking surface.
One technique experienced builders use is varying material density across zones of the floor: denser brick near the mouth, where heat loss is greatest, and marginally lighter material toward the centre, shaping how the base chars across the whole surface rather than just at one point.
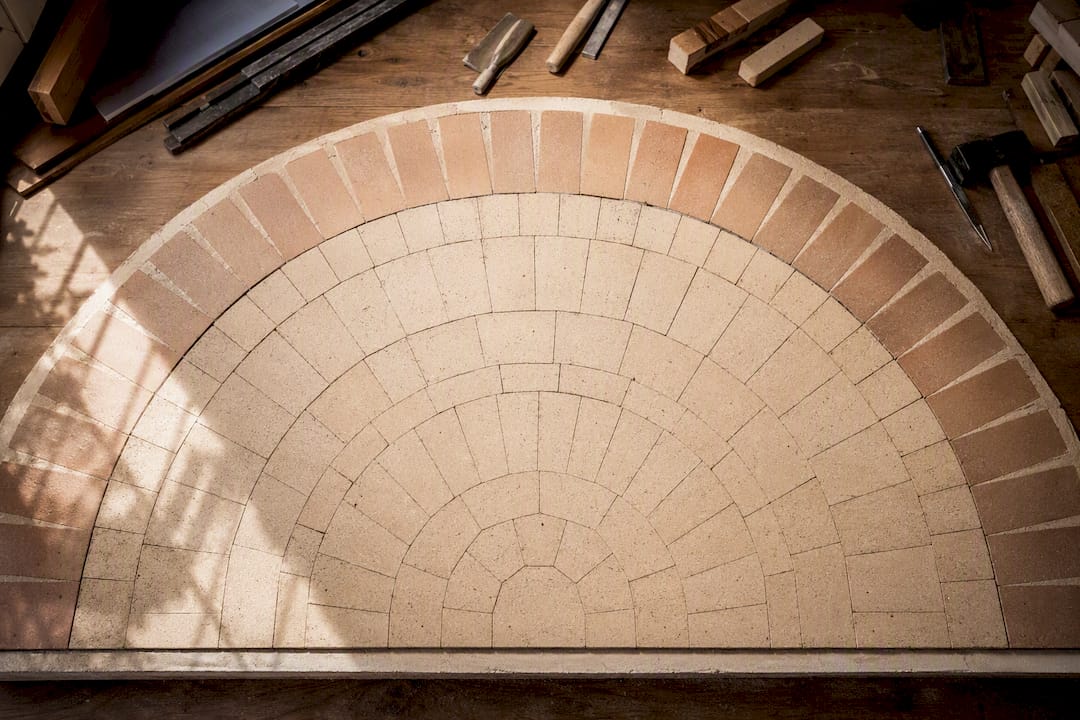
Commissioning a new oven properly matters as much as the build itself. A gradual curing schedule, starting with small fires and building up over several days, drives residual moisture out of the refractory materials without thermal shock. Skipping this step is one of the most common causes of early cracking in an otherwise well-built deck.
For businesses weighing a DIY build against a handcrafted commission, the calculation usually comes down to how much downtime a cracked or underperforming floor would cost in lost service. That’s a fair question to raise directly with a specialist before committing.
The thickness question isn’t really about the floor at all
Having worked through the thermal logic, the materials, and the build recipes, the pattern that stands out is this: floor thickness is the variable everyone fixates on, and it’s the wrong place to start. The PubMed modelling makes clear that dome radiation and convection carry most of the cooking load. Treating floor mass as the primary lever, while bolting on whatever dome and insulation happen to be convenient, produces ovens that heat unevenly no matter how thick the deck is.
The conventional advice, pick 2.5 inches and move on, isn’t wrong, but it’s incomplete. It works precisely because it assumes a reasonably insulated subfloor and a proportionate dome. Strip those away and the same 2.5 inch deck performs completely differently.
If you take one thing from this, prioritise insulation quality and system balance before you argue with yourself over half an inch of firebrick. Get the refractory board, the ceramic fibre, and the dome-to-floor proportions right first. The exact deck thickness matters far less once those fundamentals are in place.
— Bruno - Key Account & Export Manager
Why a handcrafted commercial oven beats a DIY floor guess
Getting floor thickness right on paper is one thing. Getting it right in a working pizzeria, night after night, under real service pressure, is another. Vesuviano Forni builds that certainty in from the start: our artisans size the deck, insulation stack, and dome together as one system, engineered for your specific volume and menu, rather than left to trial and error after installation.
That matters most for commercial and heavy-use kitchens, where a miscalculated floor means lost service, not just a disappointing home pizza night. Vesuviano Forni’s handcrafted commercial wood-fired ovens are built by artisans from the Vesuvian area with decades of hands-on experience, and every project includes custom design, international logistics, on-site installation and after-sales support, so the thickness and insulation decisions covered in this guide are handled by people who’ve made that call thousands of times before. If you’re planning a new pizzeria build or replacing an underperforming oven, get in touch to discuss a custom specification suited to your kitchen’s volume and layout.
Sources
For readers who want to go deeper into the technical basis for these recommendations, the pilot-scale study on wood-fired oven thermal behaviour covers the underlying heat transfer modelling, while the Forno Bravo community forum and SSFBS materials guide offer practical builder consensus on thickness and insulation choices.
- Pilot-scale study on wood-fired oven thermal behaviour (PubMed)
- Floor thickness and insulation - Forno Bravo forum
- Pizza oven materials guide — PizzaOvenWorld
- Pizza and bread oven building materials — SSFBS