How to improve pizza oven heat retention: a practical guide
How to improve pizza oven heat retention: a practical guide
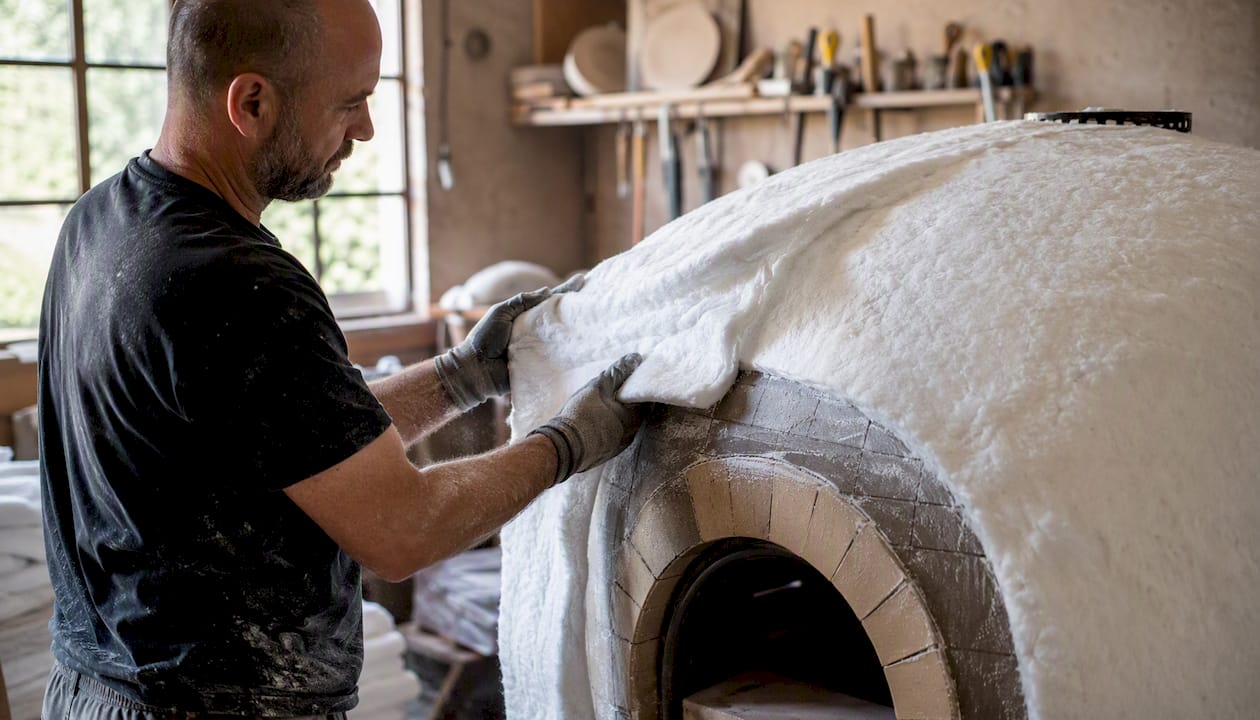
The single most effective change you can make to a pizza oven is to insulate it properly before worrying about anything else. A well-specified thermal mass combined with an insulation-first approach — 50 mm of high-density ceramic fibre wrapped around the dome, plus 50–75 mm of base insulation or a 2–3 inch perlite layer beneath the floor — is the fastest, most fuel-efficient route to consistent cooking temperatures. Without that foundation, you are simply burning more wood to compensate for heat escaping through the walls.
Four things you can do today to improve retention:
- Close the oven door between bakes to prevent convective heat loss from the vault.
- Run a water-tray test (place an aluminium tray on the floor and time how long water simmers) to gauge vault radiation versus floor conduction.
- Adjust your fuel strategy: build a solid ember bank before cooking rather than maintaining an active flame throughout.
- Check for visible cracks in mortar joints and seal them with refractory mortar before your next firing.
Key takeaways
Proper insulation, starting with the dome, is the single most effective lever for improving pizza oven heat retention and reducing fuel consumption over every session.
| Point | Details |
|---|---|
| Insulate the dome first | A 50 mm double wrap of high-density ceramic fibre (Superwool or Kaowool) gives the greatest retention gain per pound spent. |
| Base insulation prevents floor heat loss | Calcium silicate boards or perlite layers of moderate thickness help prevent the supporting structure from acting as a heat sink. |
| Measure before and after | Use an IR thermometer gun and the water-tray test to quantify performance; a well-insulated oven reaches simmer in under 90 seconds from vault radiation alone. |
| Match cooking order to the cooling curve | Saturate the oven fully, cook pizzas at peak temperature, then use residual heat for bread and roasts as the oven cools. |
| Vesuviano Forni for professional specification | For commercial builds, on-site construction, or structural re-insulation, Vesuviano Forni provides a fully specified, artisan-built solution with UK installation support. |
Table of Contents
- How pizza ovens store and lose heat
- Insulation materials: which option suits your oven?
- Where insulation matters most: dome, floor, and door
- How to measure retention and set realistic preheat expectations
- Using retained heat: fuel strategy and cooking order
- Diagnosing poor retention: quick fixes before a full retrofit
- Maintenance routines to keep insulation performing year after year
- How Vesuviano Forni approaches heat retention in professional builds
- What experienced oven builders actually watch for on site
- When a professional build makes the difference
- A builder’s perspective on what really matters
- Sources
How pizza ovens store and lose heat
The dome and floor of a pizza oven function as a thermal battery. Dense refractory materials — typically firebrick or refractory concrete — absorb energy during the preheat phase and release it steadily during cooking. The vault radiates heat downward onto the food, while the floor conducts heat directly into the base of the pizza. Both mechanisms matter, but they operate differently and degrade at different rates when insulation is poor.
A pilot-scale energy-balance study found that roughly 46% of the energy supplied by wood was lost through flue gas and about 26% through the insulated oven chamber, with vault radiation accounting for approximately 73% of the heat flow to a pizza-sized tray under quasi-steady conditions.
Attention tends to go to the dome and floor, but flue design and draught control are equally important for pizza oven temperature stability. A flue that is oversized draws too aggressively, pulling hot gas out of the chamber before it transfers energy to the masonry. One that is undersized causes smoke to back up into the cooking space. Both scenarios waste stored heat.
The three main loss paths to manage are:
- Flue gas losses — the largest single fraction; controlled by flue sizing, damper position, and firing technique.
- Conduction through the chamber walls — reduced directly by insulation thickness and material quality.
- Convective losses through openings — minimised by door management and reducing unnecessary ventilation between bakes.
The water-tray test gives you a practical read on vault radiation. Place a flat aluminium tray with a thin layer of water on the oven floor at cooking height and note how quickly it reaches a simmer. A well-saturated dome will bring the tray to temperature quickly even without a live flame, confirming that the vault is radiating effectively. If the floor heats faster than the dome radiates, your dome insulation likely needs attention.
Insulation materials: which option suits your oven?
Choosing the right insulation for a pizza oven comes down to four variables: operating temperature tolerance, thermal conductivity, ease of application, and what is practically available in the UK. The main options are perlite, vermiculite, ceramic fibre blankets (sold under brand names including Kaowool and Superwool), calcium silicate boards, and insulating mortars.
Perlite
Expanded perlite is one of the most popular DIY choices because it is lightweight, widely available from UK builders’ merchants and garden centres, and tolerates temperatures up to around 2,300°F (approximately 1,260°C). The standard DIY mix is a 5:1 perlite to Portland cement ratio by volume, applied as an external layer of 50–75 mm (2–3 inches). That thickness meaningfully reduces preheat time and improves hold time without adding significant structural weight. Perlite also simplifies application compared with layered fibre blankets, making it a practical first choice for a retrofit.
Vermiculite
Vermiculite behaves similarly to perlite and is often used interchangeably in oven builds. It has slightly higher density, which gives it marginally better thermal mass properties but also adds a little more weight. Like perlite, it is mixed with cement for structural applications and used as a loose backfill in some designs. UK availability is good through horticultural and builders’ suppliers.
Ceramic fibre blankets: Kaowool and Superwool
Ceramic fibre blankets offer the best thermal performance per millimetre of thickness, which makes them the preferred choice for dome insulation where space is limited. UK supplier guidance recommends a 50 mm double wrap of high-density Superwool (96 kg/m³) for dome insulation, with calcium silicate board at base insulation. Thicker layers are recommended for better performance. Kaowool is a comparable product; denser grades such as the 8 lb variants are recommended when long periods of continuous cooking are expected, with two layers adequate for milder climates and additional layers warranted for heavy or commercial use.
Safety note: Always wear gloves, eye protection, and a dust mask (FFP2 minimum) when handling ceramic fibre blankets. The fibres are a respiratory irritant. Wet the material lightly before cutting to reduce airborne particles.
Calcium silicate boards and insulating mortars
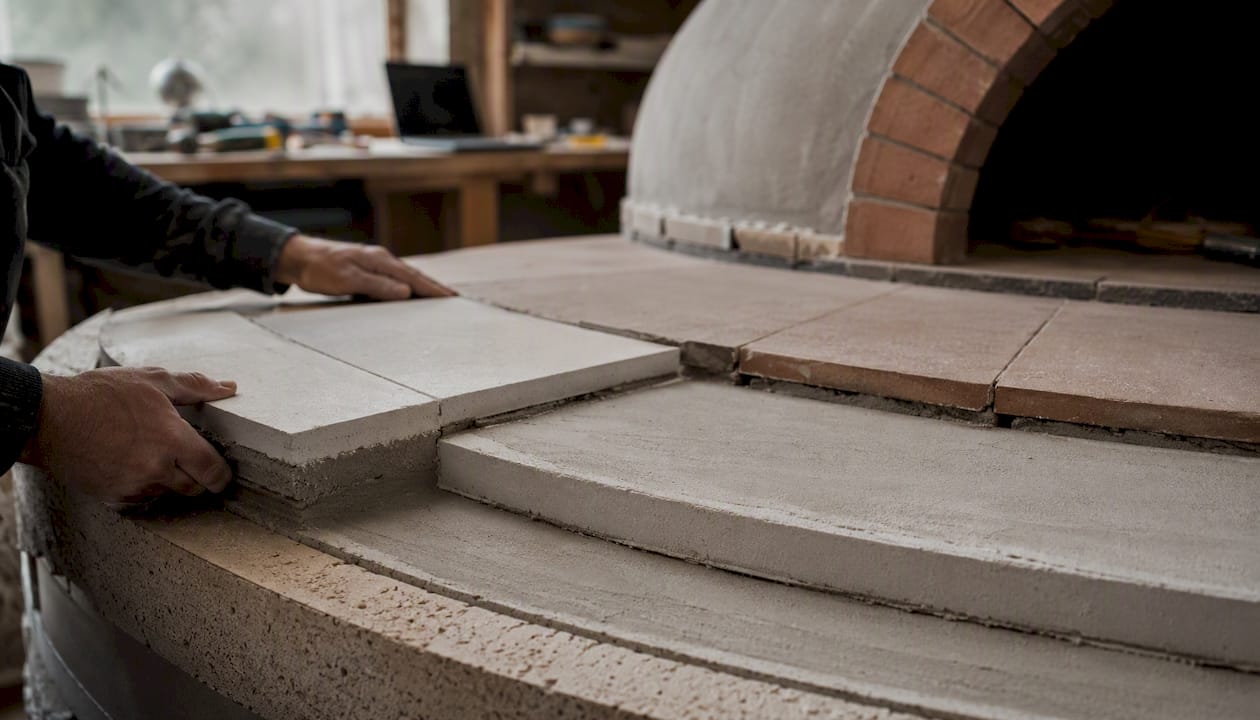
Calcium silicate boards (Skamotec225 is a commonly specified grade) are rigid, dimensionally stable, and well suited to base insulation between the oven floor and the supporting structure. They resist moisture better than loose-fill materials and provide a flat, load-bearing surface. Insulating mortars are used to fill joints and gaps in the refractory structure; they add modest insulation value but their primary role is sealing rather than bulk thermal resistance.
Where insulation matters most: dome, floor, and door
The dome is the priority. Vault radiation accounts for the dominant share of heat transfer to the food, so any insulation loss at the dome directly reduces cooking performance. The floor matters for a different reason: it conducts heat into the base of the pizza, and a poorly insulated floor also loses energy downward into the supporting structure, which acts as a heat sink.
Insulating the dome
- Allow the oven to cool completely before applying any insulation.
- Brush the exterior dome surface clean and repair any visible cracks with refractory mortar. Allow to cure fully.
- Apply the first layer of ceramic fibre blanket (25 mm), securing it with stainless steel pins or a thin scratch coat of insulating mortar.
- Apply the second 25 mm layer, staggering the joints so no gap aligns with the layer below. Total wrap: 50 mm.
- Finish with a render coat of insulating mortar or a perlite-cement mix to protect the fibre from weather and mechanical damage.
Insulating the floor
The floor requires a stable, load-bearing insulating layer between the refractory hearthstone and the supporting structure. A 25 mm calcium silicate board is the minimum; doubling to 50 mm gives a measurable improvement in floor heat retention and reduces the rate at which the base structure absorbs energy during the preheat. Lay boards tightly with staggered joints and bed them in a thin layer of refractory mortar.
Managing the door
The door is the most overlooked element of heat management. A well-fitted door with a ceramic fibre or refractory seal around its perimeter prevents convective losses between bakes. Between pizzas, close the door for at least 60–90 seconds to allow the vault to re-radiate and the floor to recover. A door that is slightly ajar is worse than one fully open because it creates a draught channel that pulls hot air out of the chamber without giving you any useful ventilation.
Pro Tip: Keep a small ember bank pushed to one side of the oven floor rather than extinguishing the fire between bakes. This maintains vault temperature without overheating the floor, giving you control over both heat sources independently.
How to measure retention and set realistic preheat expectations
Measuring performance before and after any insulation change tells you whether the work has made a real difference. You need three pieces of equipment: an infrared (IR) thermometer gun, a probe thermometer, and a flat aluminium tray for the water test. A stopwatch completes the kit. For a broader look at pizza oven accessories that support accurate temperature management, a dedicated accessories guide is worth consulting.
Preheat times for domestic brick ovens
Domestic brick ovens typically require a preheat period often ranging from under an hour to around an hour and a half depending on oven mass and insulation quality. Better-insulated ovens reach target temperature faster and hold it longer once firing stops.
| Oven size | Approximate preheat (well insulated) | Approximate preheat (thin/no insulation) | Typical hold time at cooking temp |
|---|---|---|---|
| Small (about 60 cm internal diameter) | 45–60 min | 75–90 min | 1–2 hours |
| Medium (about 80 cm internal diameter) | 60–75 min | 90 min | 2–3 hours |
| Large (100 cm+ internal diameter) | 75–90 min | 120 min | 3–4 hours |
The water-tray test
Place a shallow aluminium tray containing about 5 mm of cold water on the oven floor at the centre of the cooking area. Close the door and note the time. In a well-insulated oven at cooking temperature, the water should reach a rolling simmer within 60–90 seconds purely from vault radiation and floor conduction. If it takes significantly longer, or if the floor heats the tray faster than the dome, you have a dome insulation deficit. Repeat the test after any insulation improvement to quantify the change.
A well-insulated oven also shows a shallower temperature decay curve after firing stops. Where a thinly insulated oven might drop 100°C in 30 minutes, a properly wrapped dome typically loses that same margin over 60–90 minutes, giving you a much longer usable cooking window.
Using retained heat: fuel strategy and cooking order
Plan the session to match the oven’s cooling curve: cook pizzas first at peak vault temperature, then move to bread or roasts as the oven cools and floor conduction becomes the dominant heat source. This is not just a convenience tip — it is how the thermal mass is designed to be used. Treating the oven as a battery that charges during the fire and discharges during cooking is the mindset that separates efficient sessions from frustrating ones.
A practical session checklist:
- Saturate the oven first. Fire the oven for at least 45–60 minutes before cooking, allowing the dome and floor to absorb heat fully. A pale, even colouring across the dome interior signals saturation.
- Cook pizzas at peak temperature (typically 400–450°C floor, 450–500°C vault for Neapolitan style). Refer to Neapolitan temperature targets for precise guidance.
- Taper the fire gradually rather than letting it die suddenly. Push embers to the side and reduce wood additions 20–30 minutes before you want to switch from pizza to bread.
- Use the door to tune bottom heat. A partially closed door during the bread phase traps residual vault heat while allowing the floor temperature to settle to a lower, more suitable level.
- Batch similar items together to avoid opening the door repeatedly, which accelerates heat loss.
Pro Tip: Bank a fist-sized cluster of embers at the rear of the oven and leave the door at a quarter-open position for 10–15 minutes before bread baking. This creates a gentle, even heat environment without the aggressive vault radiation that would burn a loaf’s crust before the crumb sets.
For a detailed walkthrough of firing technique and wood selection, the practical wood-fired oven guide covers the full session from lighting to cool-down.
Diagnosing poor retention: quick fixes before a full retrofit
Poor pizza oven heat retention usually has one of four causes: damp insulation, thin or absent insulation, flue losses, or cracked mortar joints. Running a quick diagnostic before committing to a full rebuild saves both time and money.
Diagnostic checklist:
- Scan the exterior dome with an IR gun during a firing. Hot spots on the outer surface indicate thin or missing insulation at that point.
- Run the water-tray test and time it. A result significantly above 90 seconds at full temperature points to dome insulation failure.
- Inspect mortar joints visually for cracks or gaps, particularly around the flue collar and door frame.
- Check the flue draught by holding a piece of tissue near the flue opening. Excessive pull indicates an oversized flue or a missing damper.
Quick fixes to try first:
- Patch hairline cracks in mortar joints with refractory mortar. Allow to cure before the next firing.
- Add a temporary ceramic fibre wrap over the dome exterior, secured with wire mesh, as an interim measure before a permanent render.
- Fit or improve the door seal with a ceramic fibre rope gasket around the door frame.
- Adjust the flue damper to reduce draught and slow flue gas exit during the cooking phase.
Safety warnings: Never block the flue completely. Always allow the oven to cool fully before applying any repair materials. Structural cracks running through the dome thickness, comprehensive re-insulation of an existing build, or flue resizing all require a professional assessment rather than a DIY patch.
Maintenance routines to keep insulation performing year after year
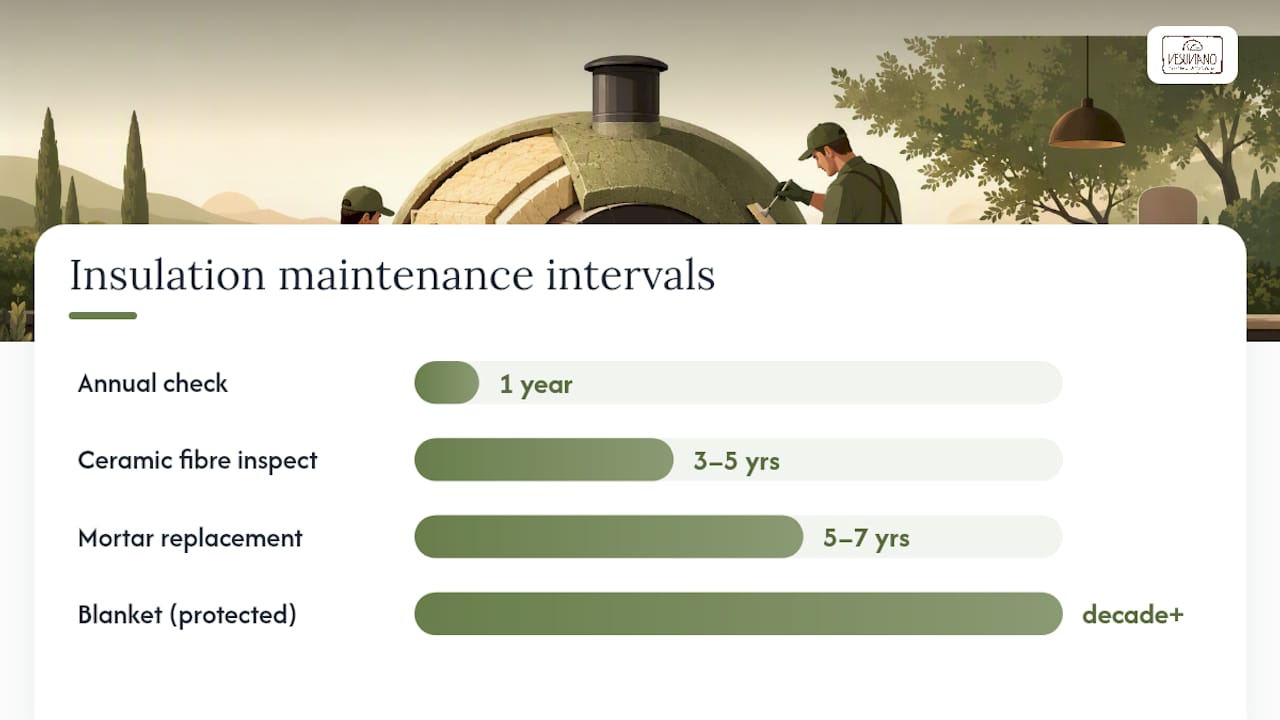
Insulation degrades gradually, and outdoor ovens in the UK face particular challenges from moisture ingress and freeze-thaw cycles. A simple annual check catches problems before they become expensive.
- Before the first firing of the season: inspect the exterior render or perlite coat for cracks or spalling. Check that the dome wrap (if visible) has not shifted or compressed. Look for signs of damp staining on the base structure.
- Check perlite and vermiculite backfill by probing with a thin rod at the fill points. Settled or compacted backfill has reduced insulating value and may need topping up.
- Inspect ceramic fibre condition every 3–5 years. High-density Superwool or Kaowool blankets correctly applied and protected by a render coat can last considerably longer, but any blanket exposed to direct weather or mechanical damage will degrade faster.
- Seal any new cracks in mortar joints promptly with refractory mortar. Small cracks become large ones after a few freeze-thaw cycles.
- Cover the oven when not in use. A breathable waterproof cover protects the render and insulation from rain while allowing moisture to escape. Trapping moisture under an impermeable cover causes more damage than leaving the oven uncovered.
- After extended wet periods, fire the oven gently at low temperature for 30–45 minutes before a full firing to drive out absorbed moisture. Rapid heating of a damp oven can cause spalling in the refractory layer.
For outdoor installations and the specific material choices that UK weather demands, the outdoor pizza oven guide covers weatherproofing in more detail.
Insulating mortars used in joints typically need partial replacement after 5–7 years of regular use. Ceramic fibre blankets in a protected, correctly rendered dome can remain effective for a decade or more. The trigger for replacement is performance, not calendar time: if preheat times lengthen noticeably or the oven struggles to hold temperature despite correct firing, the insulation is the first thing to investigate.
How Vesuviano Forni approaches heat retention in professional builds
A professional oven build starts with an insulation specification, not a cosmetic one. Vesuviano Forni’s approach prioritises an insulation-first construction method, with artisan refractory work and specified insulation layers built into every oven to guarantee cooking performance at the temperatures professional use demands.
In practice, this means:
- Dome construction uses dense refractory brick laid by hand to precise tolerances, with a specified ceramic fibre wrap applied over the completed dome before any decorative finish.
- Floor insulation uses a calcium silicate base layer between the refractory hearthstone and the supporting structure, preventing energy loss downward into the stand.
- Flue design is sized to the oven chamber volume, balancing draught for clean combustion against heat retention. The VesuvioBuono system integrates low-emission flue technology with the same insulation standards, eliminating black soot without compromising thermal performance.
- Custom sizing accounts for the intended cooking load, so a larger chamber gets proportionally more insulation mass rather than simply scaling up the refractory.
When should you consult Vesuviano Forni rather than attempting a DIY solution?
- You need a guaranteed thermal specification for a commercial or high-volume setting.
- The project involves an on-site build or a bespoke chamber size that standard kits cannot accommodate.
- Structural re-insulation is required on an existing oven where the dome or base has failed.
- You are considering a low-emission upgrade or a commercial wood-fired oven with integrated flue management.
What experienced oven builders actually watch for on site
Three signs tell an experienced builder that an oven will retain heat well before a single pizza is cooked. First, the dome interior shows an even, consistent colouring after the first full firing — patchy or streaky discolouration suggests uneven refractory density or gaps in the mortar joints that will become heat-loss points. Second, the dome joints are tight and flush, with no visible gaps at the brick interfaces. Third, the floor thickness is consistent across the entire cooking surface; a floor that is thicker at the edges than the centre creates uneven conduction and produces inconsistent results.
On the insulation side, how the backfill is compacted matters as much as what material is used. Perlite or vermiculite that has been poured loosely without tamping will settle over time, leaving an air gap at the top of the fill that defeats the purpose of the layer. Builders compact backfill in stages, checking for voids before the render coat goes on.
Flue behaviour is another telling indicator. A correctly sized flue produces a steady, moderate draw with a clean flame that leans gently toward the flue opening. An aggressive, roaring draw signals an oversized flue that is pulling heat out of the chamber faster than the masonry can absorb it.
A domestic build will always cool faster than a purpose-made professional oven simply because of mass. A well-insulated home oven of medium size can hold cooking temperature for a couple of hours after firing stops. A professional oven of the same internal diameter, built with greater refractory mass and a full insulation specification, can hold usable heat for considerably longer. The gap is real, and it is worth understanding when deciding whether a DIY retrofit or a professional build better suits your cooking ambitions.
When a professional build makes the difference
For home cooks who have pushed their current oven as far as DIY insulation allows, or for anyone planning a new build with a specific performance target, a professional specification removes the guesswork entirely.
Vesuviano Forni brings together Neapolitan artisans with generations of oven-building experience, combining traditional refractory craftsmanship with modern insulation engineering. Every oven leaves Naples with a defined thermal specification: the dome wrap, base insulation, and flue sizing are calculated for the chamber volume and intended cooking load, not estimated. For UK customers, the full service covers technical consultancy, international logistics, customs clearance, and on-site installation, so the oven arrives ready to perform from the first firing.
If you are considering a handcrafted Neapolitan oven for a pizzeria, restaurant, or serious domestic kitchen, or if you need an on-site build that meets a specific thermal or emission standard, contact Vesuviano Forni for a site assessment and specification review.
A builder’s perspective on what really matters
Most guides focus on materials and miss the thing that actually separates a good build from a frustrating one: consistency. Not the consistency of the recipe or the dough, but the physical consistency of the oven itself.
When I look at a finished dome, the first thing I check is not the insulation thickness on the specification sheet. It is the colouring of the interior after the first full firing. An even, pale cream across the entire vault tells you the refractory mass is uniform and the heat is distributing as it should. Dark patches or streaks tell you there are voids, thin spots, or poorly bonded joints that will become heat-loss points under repeated thermal cycling.
The second thing is the floor. A floor that is 10 mm thicker at the back than the front will cook pizzas unevenly, and no amount of dome insulation fixes that. Consistent floor thickness is a craftsmanship issue, not a materials issue.
What I find home cooks consistently underestimate is the patience required at the preheat stage. Rushing the fire to get to cooking temperature faster is the single most common cause of disappointing results. The thermal mass needs time to saturate fully. A 60-minute preheat in a medium oven is not a suggestion — it is the minimum for the floor to reach the temperature the dome has already achieved. Cut that short and you will burn the top of every pizza before the base is cooked through.
A domestic build will never match a purpose-built professional oven on hold time. But with the right insulation and the right firing discipline, it can get surprisingly close.
Sources
- Semiempirical modeling of a traditional wood-fired pizza oven in quasi-steady-state operating conditions - PubMed
- Build the Ultimate Pizza Oven with Perlite Insulation - Supreme Perlite
- Orionheating
- Kaowool | Kale Wool | Ceramic Insulation - 8lb / 50sf Roll – BrickWood Ovens
- Making the most of the retained heat in your woodfired oven - Manna from Devon